3 Easy Ways to Look Your Best in a Button-up
3 Easy Ways to Look Your Best in a Button-up

Erin Gray
Erin Gray (Pronoun: she/her) is a Portland, OR based writer with an affinity for working behind the scenes with companies that offer something unique to their market. When she’s not writing, she likes to roam around mossy hiking trails, wear leather hats, and build stuff. You can find her on instagram @rawhidelaces or email her by clicking on the little envelope below:
Button-ups are for looking sharp, so why not amp up that effect by nailing down some small key details?
After all, it never hurts to get noticed as someone who pays attention to detail!
Don’t worry, none of these tips have to do with ironing. We’re gonna go ahead and assume that if you’re the type to iron your button-ups, you’re doing so already.
And if you’re not the ironing-type, maybe you’re doing the whole “hang it up in the bathroom while you take a hot shower so that the steam flattens out wrinkles” trick. We’ve found success rates vary with that one, depending on the size and relative steamy-ness of your bathroom.
Look at that! We’ve let a tip slip and we haven’t even started counting yet.
Better throw some numbers on these tips stat!
Here are 3 low-effort maximum-impact ways to make sure that you look your best in a button-up:
#1 - Expert Level Cuffing (not just for jeans!)
When it’s time to get to work and look good doing it, you roll up those sleeves!
There is actually a reason that this looks so attractive to the human eyeball - it’s a visual principle called “the rule of thirds” - rolling up your cuff to expose about a third of your arm creates a pleasing visual balance. Hurray for style science!
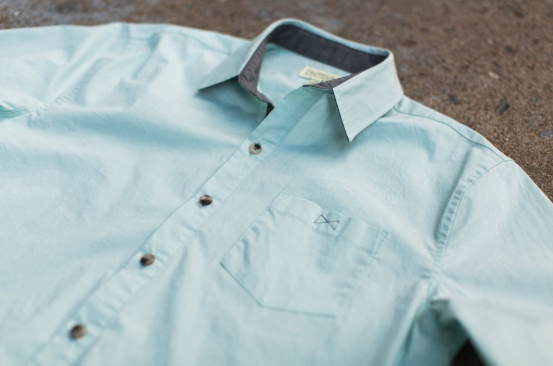
And while there is nothing wrong with doing the simple sleeve roll you’re used to, there is also an easy alternative for when you want to stand out. When it's time to take things up a notch (and properly show off the stylish contrasting inner cuff on your Dapper Boi button-up) try this roll on for size:

Second, pull the cuff up your arm so that the lower edge of the cuff sits in the crook of your elbow:

Third, roll up the rest of your sleeve, leaving the top of the cuff exposed:

Volia! The finished Master Sleeve Roll:

Check out the full video by 1 Like No Other to see this process in motion.
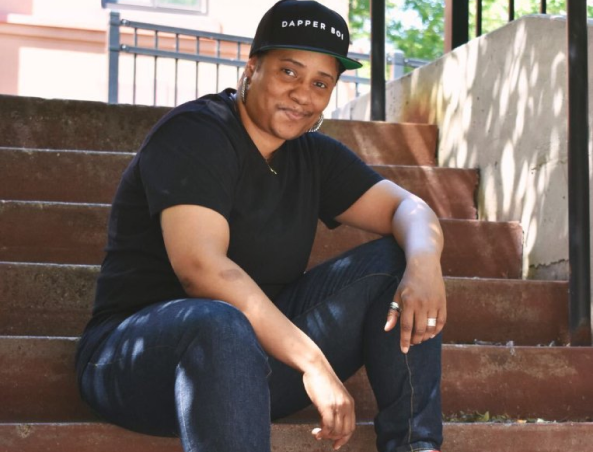
If you need any more reason to rock the Master Sleeve Roll, here’s Celeste looking super sharp and showing off some contrasting cuff:

#2 - Fight Fraying with Fire!
It happens to every shirt eventually: little threads start making a break for it.
You’ll notice this most commonly around the buttonholes on your button-ups, or around the bottom edge of your t-shirts.
It’s one of those small things that often goes unnoticed, but taking care of it will help keep your shirts from unraveling any further.
Let’s keep that favorite shirt around longer, shall we?
Let’s get one thing straight right off the bat: The worst thing you can do is pull at the threads.
Cutting them with scissors is an acceptable middle ground. If you’ve got Frankenstein tendencies, feel free to stick with the scissors and skip on over to tip #3.
But the best solution? Your handy lighter.
The benefit to burning frayed ends instead of cutting them is that the thread will burn almost all the way down to the seam (but not all the way) and that will keep the same thread from fraying again.
If the fabric has any percentage of synthetic material (such as elastane or polyester), there will be the added benefit of the thread tip becoming sealed off, never to fray again.
Safety first - don’t do this to a garment you’re wearing.
If you’ve got a garment with quite a few frayed threads to burn, go outside. No sense filling your apartment with that burned fabric smell.
First, gently pinch the frayed threads so that they point straight up and away from the garment.
The threads you’re going to burn should be close to one centimeter long.
Next, take the lighter and hold it near the end of the frayed thread.
The end of the thread will catch as soon as the flame barely grazes it. The flame from the lighter never has to actually go near the intact material of your shirt (nor should it).
The flame will travel down the thread, almost to the seam, and then self-extinguish.
Pro tip: If you’d like to get the hang of this process without trying it on a shirt straight away, practice first on a pair of leather shoes or boots to get the hang of it.
You’ll definitely find some frayed threads around the stitching of a pair you wear a lot, and it’s nearly impossible to mess up because leather has a higher resistance to fire than most fabric.
#3 - Protect Against Pit-stains

But when things heat up, there are two key ways to keep your button-up looking fresh and free from sweat stains.
First, make sure you’re wearing an undershirt.
A breathable, 100% cotton v-neck undershirt with short sleeves will provide a barrier against pit stains while keeping you cool and remaining comfortably out of sight under your button-up.
That’s right - that humble three-pack of thin white shirts is a super affordable investment in preserving your favorite button-ups.
It’s a key layer of protection, basically a shirt condom - that’s why if a friend borrows your button-up, feel free to borrow this metaphor and insist that they wear one!
Second, avoid using antiperspirants with aluminum as an ingredient.
Besides the increased cancer risk (which honestly should be reason enough), aluminum salts in antiperspirants have a nasty habit of mixing with sweat and creating those distinct yellow stains that put your button-up out of commission.
It doesn’t have to be this way - with so many options for effective aluminum-free deodorants in today’s market, you can easily find one that works for you.
So check the label and ditch the aluminum - it’s kinder to your body and your button-ups.
Time for a Bonus Fact!

Confidence is sexy, and knowledge boosts confidence.
So here’s a bit of button-up knowledge for ya:
Lots of people use the terms “button-up” and “button-down” interchangeably to refer to the same kind of shirt - one that has a full placket of buttons placed front and center.
But did you know these terms actually have different meanings?
(Maybe you did, but play along.)
A “button-up” shirt is simply that - any shirt that buttons up the front starting from the bottom.
A “button-down” shirt refers to a shirt with a specific kind of collar that can be fastened down with buttons to keep it in place.
So a button-down shirt is pretty much always also a button-up, but a button-up shirt isn’t always a button-down.
It’s kinda like how bourbons are always whiskeys, but all whiskeys are not bourbons - oh hey, another bonus fact!
Warning: Now that you know this, you’ll start noticing how many people use these terms incorrectly.
We don’t recommend using your knowledge to correct them (don’t be that guy). Instead, just sit back and smile to yourself, because you know the right names for things, you sexy genius.
That’s it for today!
What’s your favorite way to keep your button-ups looking sharp?
Interested in maintaining your bottoms as well as your tops? Check out our article on Caring for / Breaking-in Jeans and Chinos!
0 comments